Pre and post buffers give you extra time before or after appointments for preparation, travel, follow-up, or other transition activities. The system automatically uses configured buffer times when calculating appointment availability. You can also display those buffers directly in Day and Week Calendar views, making it easier to understand your schedule at a glance. This article explains how to configure, view, and manage pre- and post-buffer time.
TABLE OF CONTENTS
What is Pre and Post Buffer Time?
Pre- and post-buffer times reserve additional time immediately before or after an appointment. These periods help prevent appointments from being scheduled too close together while giving users dedicated transition time for activities such as preparation, travel, documentation, or follow-up.
A pre-buffer reserves time before an appointment, while a post-buffer reserves time after it. Buffer settings are configured at the calendar level and influence which appointment slots remain available for booking.
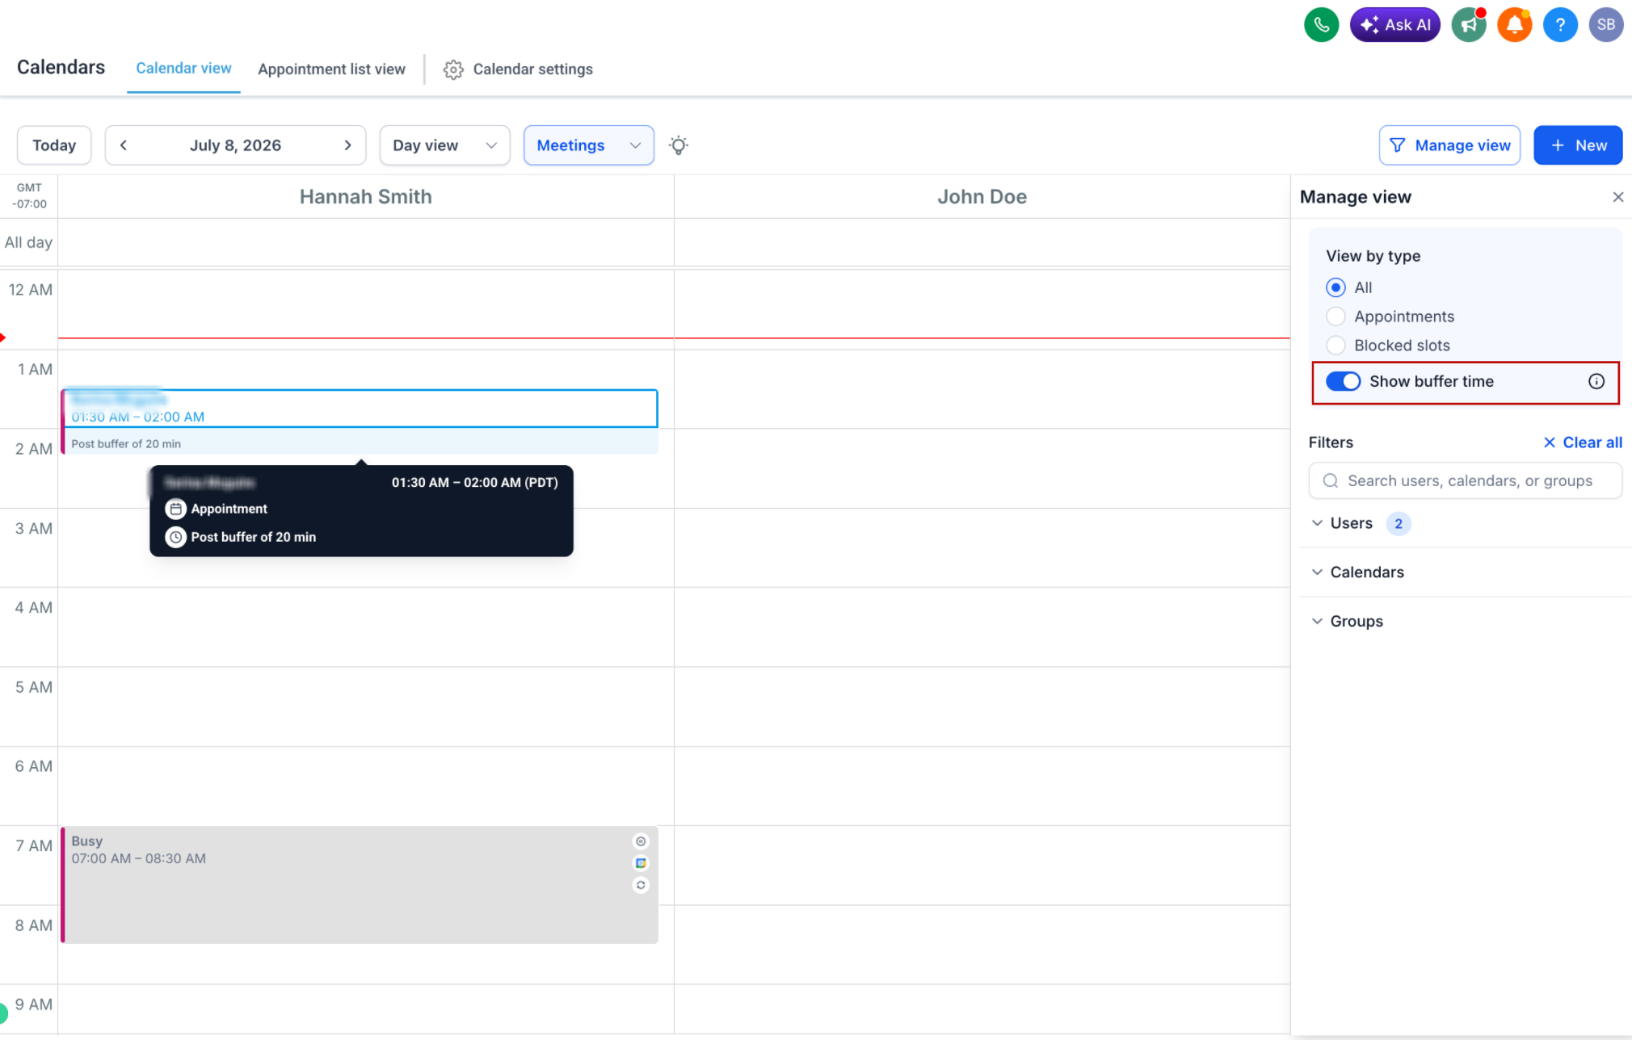
The calendar can also display configured buffers as informational blocks in the Day and Week Calendar views. This visual representation makes it easier to distinguish appointment time from the transition time surrounding it.
Key Benefits of Pre and Post Buffer Time
- Better schedule visibility: View configured pre- and post-buffer periods directly alongside appointments in Day and Week views.
- More preparation time: Reserve time before meetings for research, setup, travel, or other preparation.
- More follow-up time: Add space after appointments for notes, administrative work, cleanup, or travel.
- Reduced back-to-back scheduling: Prevent new appointments from being booked too close to existing appointments.
- Easier schedule planning: Visually identify the time occupied by buffers without confusing it with the appointment itself.
- Flexible calendar management: Show or hide buffer blocks in Calendar View without changing the underlying buffer configuration.
How Buffer Time Affects Appointment Availability
Buffer time becomes part of the availability calculation around an appointment. Understanding this behavior helps explain why a time period that appears open may not always be available for another booking.
For example, if an appointment lasts 30 minutes and has a 15-minute pre-buffer and a 15-minute post-buffer, the system reserves additional time on both sides of the appointment. A new appointment must satisfy the buffer requirements of both the existing appointment and the appointment being scheduled.
Using both pre- and post-buffers can create situations where apparently open periods cannot be booked because the required buffers overlap. If maximizing the number of bookable time slots is important, consider whether only a pre-buffer or only a post-buffer is necessary for the calendar.
Buffer settings associated with a user can also affect that user's availability on other calendars:
- On Round Robin calendars, buffer settings from a user's other calendars can affect availability and may contribute to uneven appointment distribution.
- On Collective calendars, a user's existing buffer time can prevent a slot from being available when that user is required for the appointment.
Viewing Buffer Time in Day and Week Calendar Views
Visible buffer blocks help users understand why time surrounding an appointment is unavailable without having to review the calendar's configuration. The display is informational and does not change the duration or scheduling behavior of the configured buffer.
- Go to Calendars.
- Open Calendar view.
- Click Manage view.
- Turn on Show buffer time.
- Use the available Users, Calendars, Groups, or other supported filters to view the relevant schedule.
- Pre- and post-buffer periods associated with appointments will appear as visually distinct blocks next to the appointment.
Turning Show buffer time off only hides the buffer blocks from Calendar View. It does not remove the configured buffer or make the reserved time available for booking.
How To Setup Pre and Post Buffer Time
Properly configuring buffer time ensures the system reserves the intended amount of transition time when calculating appointment availability. Choose buffer durations based on the preparation or follow-up time realistically required for the type of appointment being scheduled.
- Go to Calendars.
- Open Calendar settings.
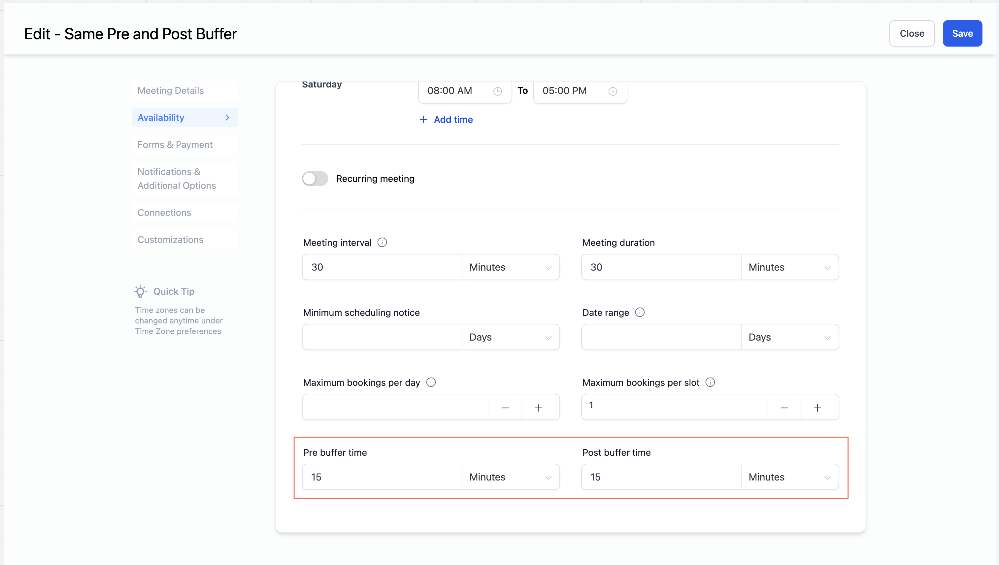
- Select the calendar where you want to configure buffer time and click Edit.
- Open the Availability settings.
- Locate Pre buffer time and Post buffer time.
- Set the desired duration for either or both buffer types.
- Save your changes.
To remove buffer time from future availability calculations:
- Return to the calendar's Availability settings.
- Set the applicable Pre buffer time or Post buffer time value to 0.
- Save your changes.
Buffer behavior is based on the current calendar settings, so changing the configured duration can alter how availability is calculated around appointments.
Frequently Asked Questions
Q: Does turning off Show buffer time remove the actual buffer?
No. The Show buffer time toggle controls only whether buffer blocks are visible in Calendar View. The configured pre- or post-buffer continues to affect appointment availability.
Q: Why can't I see buffer time in my current Calendar view?
Buffer visibility is supported in Day and Week views. Confirm that you are using one of those views and that Manage view → Show buffer time is enabled.
Q: Does displaying buffer time change appointment availability?
No. Displaying a buffer only makes the existing reserved period visible. Appointment availability is determined by the buffer duration configured in the calendar settings.
Q: What is the difference between a buffer and a blocked calendar event?
A buffer is transition time reserved before or after an appointment. A blocked event or conflict-calendar event represents a separate period when a user is unavailable because of another calendar commitment.
Q: Can I change a buffer after appointments have already been booked?
Yes. Buffer calculations use the latest applicable settings, so changing the configured buffer can affect availability around existing appointments.
Q: Why does a time period look open but remain unavailable for booking?
The available period may not be long enough to satisfy the appointment duration and required buffers. Using both pre- and post-buffers can also create overlapping buffer requirements that remove otherwise visible time from the booking schedule.
Q: Can buffer settings affect Round Robin appointment distribution?
Yes. A user's buffer time can affect their availability across calendars. If users have different buffer requirements, the number of available slots for each user can differ and may influence distribution.
Q: Do third-party calendar events automatically receive visible buffers?
Not necessarily. Third-party events may be treated as appointments or as blocked availability depending on the calendar synchronization configuration. Buffer display should not be confused with external busy or conflict periods.